Well its the last day of this project, and finally got it all sortd out at last, Anna and Dan R had finisehd off all the sounds Fx, whlie me and Dan C found some sounds for the intrduction and the credits. Then all we had to do was play around with the sounds leveles to all the sounds the same level. Then so all we had to was render this from premier pro.
I have really enojoyed this project and the results that we have come out with in the end. I feel that worked really well with Anna, Dan C and Dan R and the way that they work, they are very hard working and they plan things out very well so we know whats going on and what need to be done. I was abit apprehensive at first just becuse I was tiny bit unsure I they would like me working with them, but as time when on i got more comfortable in the group, and hope they have like me working in there group. I would love to work with them again because they hvae great ideas and i think the group combine I think works really well, in generating ideas and the technologic skill to make these happen. Plus every one gets on well with each other.
Well for now its over and out ! ........................
Friday 7 March 2008
Thursday 6 March 2008
last couple of manic dayzz
Well its been a really tight week this week, tring to fit every thing possible that we could into the last couple of days. At the start of the week we wrote down a day by day list for for every one in ur group what they need to do still (which was quite alot and more problems kept poping up) and when they need to be completed by.
All we need now is to add the sounds which Anna and Dan R have been working on today matching this up with the a block out so can just put the proper animation into place with out too much work needing to be done, while me and Dan C and sorted out the rendering other little problems and post-production work.
Tuesday 4 March 2008
Final images
Here are some of the render screen shots that ive done . There pretty much self explanatory.


Gem test with different styles
With palying around with a few of the setting for the gem shaderd here it what I have manged to produce. You can get lots of differents effects with just moving a few things around.


Friday 29 February 2008
Using the Trax Editor
To test out using the Trax editor I try it out on the dream catchers that are going to be blowing about in the tree. Its quite simple using the trax's are as you can edit things really easily in a non liner way.
Heres what ive done
Wednesday 27 February 2008
Week 8 i think
Well the last couple of weeks have gone soo fast i dont know where the week have gone ! Slightly panicing a tiny bit as every one else is, but am sure we will get there in the end, I hope. Mainly this week and the last ive been texturing and modling afew stuff really, and normal mapping the objects from Zbrush into maya.
Doing the normal mapping was just hard and very frustraing as it can take a while to bake the normal map and with the pc at college they keep crashing all the time which wasnt good at all, as kept losing the work that i had just done. Mayb it was just the computer that I was on, but all so Dan Ryan computer kept doing the same.
Doing the texturing this time round is has not taken as long last time, in the past project, as mainly I know what there is to do and how to go about doing this, but still it take up alot of time, The Results are very good on the objects that I have done and they are fitting in well with the environment.
With the project needing to be compleatd by next week,I think that the next couple of days for all of us are going to be really stressfull and really tiring as there is many things to be done still. Like puttng all the stuff in the environment scene and animation, lighting and other stuff. HELLPP !!
Tuesday 26 February 2008
more Z brushing
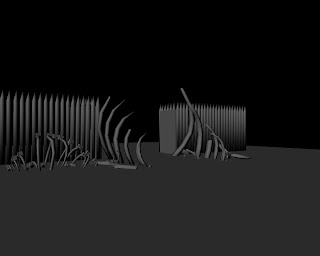
Here are a couple more screen shots of part of the secene.
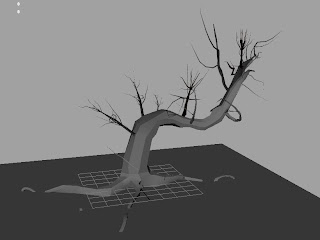
 Here is the tree which when I tryed to make it all out of polys it was getting too high, so i came up with a good idea. I wanted to make the branches look like branches but from just using planes and not actual models. So I tryed painting the branches in photoshop but they just wasnt loooking as they should. So I took some free models off the internet that had lots of branches that I could use to make a texture out of. To make the texuture I redererd what I wanted to use as a texutre and in the render options changed that to alpha map and saved that image, going back into photoshop changed the colour and made it have a transparent background so you only see the branches. The just moved these all round the tree. With doig this it lowers the poly count and it still has the desired effect.
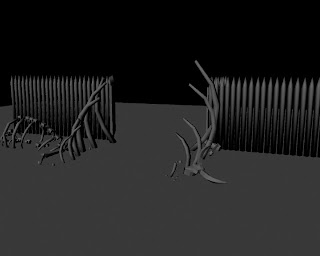
 More of the fence that I shaped in Z bursh.
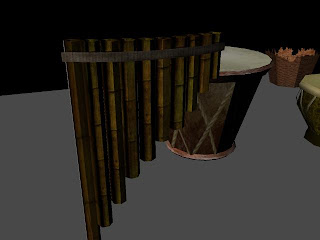
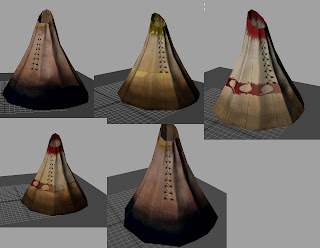
 At last here is the final Teepee that I was happy with, but previously it wasnt looking right, but now its looking as it should.

 Here is the tree which when I tryed to make it all out of polys it was getting too high, so i came up with a good idea. I wanted to make the branches look like branches but from just using planes and not actual models. So I tryed painting the branches in photoshop but they just wasnt loooking as they should. So I took some free models off the internet that had lots of branches that I could use to make a texture out of. To make the texuture I redererd what I wanted to use as a texutre and in the render options changed that to alpha map and saved that image, going back into photoshop changed the colour and made it have a transparent background so you only see the branches. The just moved these all round the tree. With doig this it lowers the poly count and it still has the desired effect.
 More of the fence that I shaped in Z bursh.
 At last here is the final Teepee that I was happy with, but previously it wasnt looking right, but now its looking as it should.
Rough drawings
Here are some little drawing that I drew and used these for reference to model them in Maya.


Wednesday 20 February 2008
wicker basket testing
With the wicker baskets, I made them from polygons and duplicated them up to get the shape of them and the holes inbetween. They looked really good with all the different shapes, but again the problem was the poly count was too high. I didnt know if just using a cube and changing the shape would really work and just using a texture.
 Here in the foreground is the textured one and in the background is the ploy version I think it works to some extent but i could have made the texture more transparent inbewteen the wicker which i can change at a later date.
 Here are the Uv maps for the baskets and ive also made the texture abit lighter.

Dream catcher test
I wanted to do a little test for the Dream Catcher in the trees, but I knew Anna really wanted to do this, and didnt wanna take over, so after I made it I show her to see what she thought of it, and she really like it, weather she was being kind or not I dont know, (soz) but this was just a test really too see about just using textures instead of modeing it. I took one of the default trees from 3D studio max and imported that into Maya and looked for a texture for the dream catcher edited that in photoshop. From doing the transparence on the buffalo skin I used the same process for the dream catcher and put that in the tree. This is not the treee that we are going to use but as it was a test I wanted to use some quick as easy so show the use of it.
The Camera never comes that close to the tree so they wont be seen in much detail but I think they look really from a distance.


The Camera never comes that close to the tree so they wont be seen in much detail but I think they look really from a distance.


Buffalo Skin
Well this looks really simple to create and it was, but to get the buffalo skin texture transparent around the edges was alot hard then I thought as I forgot the process of how to create part that were transparent. I asked around a few people and they help me out. :) This didnt need to be overly deataild as its in the background.


Watch Towers_rock and fence
With these watch towers I have had to make a few alteration in the design slightly from at first in looking really skinny with the high poly rope which i really liked but this did add a hell of alot of ploly has each rope was around 200 + times that by 8 and well thats too much that can be done with out. so thats gone now.
Also the Dan R and Anna said they need to be more chunkyer as they looked abit flimsy which i totally agree with!
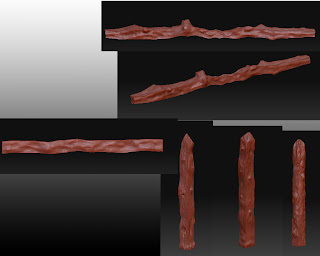
 Below I made the poles more tree like as that looked too planed and manufactured where below it looks more natrual as if they have been cut down from a real tree with branch stumps and digs where they have been chopped down.

Here the rope has gone and I have added soem rocks that will be in the scene. In the background there is the fence for the buffalo pen where the skeletons wil be placed. I have changed the ladder, as this had lots of rope which really need to get rid of and alsothe rungs of the ladder more uneven in the lengh.

Also the Dan R and Anna said they need to be more chunkyer as they looked abit flimsy which i totally agree with!
Below I made the poles more tree like as that looked too planed and manufactured where below it looks more natrual as if they have been cut down from a real tree with branch stumps and digs where they have been chopped down.
Here the rope has gone and I have added soem rocks that will be in the scene. In the background there is the fence for the buffalo pen where the skeletons wil be placed. I have changed the ladder, as this had lots of rope which really need to get rid of and alsothe rungs of the ladder more uneven in the lengh.

Monday 18 February 2008
Teepee Updates
Well since starting on the teepees a while back they have been quite a few little tweaks to the shape and how it looks in genral. Here are the process images from starting out to nearing the end out the model. This was the first attemps at the teepee's and they were ok but still room for improvment. I show it to the rest of our group and they liked it : ) but they pretty much said they were too round at the bottom and needed to be more like where you could see the structure of the wooden poles under neath it. Also I thought the tops of the wooden ploes were too uniformd as well, they need to be more random.


Ths was my next attemp at the teepees but the only thing changed really was slecting every other vert and moving that out wards, + I added just the structure where once a teepee stood which I think works really well as the camp is very old and no one has been living there for a while.

What I did here was deleted every other of the vertical edges on the teepee which gave it more of a teepee looking shape and not soo rounded either. I also changed the lengh of the surport poles at the top which dramicly impoved it

From the picture above I duplicated it then this was going to be the high poly version for doing the normal mapping and I also add some colour to see what tis going to be like, instead of gray.

The small ornage rounded teepee in the background is the high ploy verison that I used to create the normal map.
 Here are the Z bursh imaegs that ive been working on the last coulpe of days.


Subscribe to:
Posts (Atom)